🌿 Zahirwen's Note
One of the nicest things about making pictures from gathered materials is that
you do not really know what you are making until you begin looking at what you
have found.
A crooked twig might become the perfect branch. A smooth pebble suddenly looks
like a bird. A dried seed head might become a flower, a berry, or something that
does not need a name at all.
The aim is not to make nature behave perfectly. It is to notice the shapes that
are already there and give them somewhere to belong.
🍂 Cottage Tip:
Lay everything out before reaching for the glue. Move the pieces around, turn
pebbles in different directions and let the picture slowly appear.
Gather Your Supplies
Natural Materials
- Thin fallen twigs and small branches
- Smooth pebbles or tiny stones
- Acorns and acorn caps
- Dried seed heads
- Dried grasses or flowers
- Small cones or pieces of bark
- Pressed leaves or fern pieces
Craft Supplies
- Wooden panel, sturdy card or small canvas
- Or a deep box picture frame
- Strong craft glue or glue gun
- Pencil and eraser
- Scissors or secateurs for trimming twigs
- Optional paint for the background
- Optional natural twine or fine cord
🍂 Gathering Kindly
A nature picture only needs a handful of materials. Gather thoughtfully and let
what has already fallen provide most of what you need.
Good Things to Gather
- Dry fallen twigs
- Loose pebbles from your own garden or places where collecting is permitted
- Fallen acorns and empty acorn caps
- Dried seed heads from your own garden
- Wind-fallen leaves
- Florist or garden offcuts
Leave Behind
- Living branches and healthy growing plants
- Nests, shells, eggs or anything being used by wildlife
- Protected or rare plants
- Materials from protected places where gathering is not permitted
- Anything you are unsure about
Ask permission before gathering on private land and follow local rules in parks,
woodlands and protected places. Take only a little and leave plenty behind for
wildlife and the landscape.
🪵 Before You Begin
-
Make sure everything is dry
Leave gathered twigs, seed heads and other plant material somewhere airy until
completely dry. Damp materials may mould once enclosed or glued.
-
Clean gently
Brush away loose dirt with a dry paintbrush or cloth. Wash pebbles if needed and
allow them to dry thoroughly.
-
Choose your background
Use the natural surface of your board or frame backing, or add a soft painted
wash. Cream, muted sage, faded blue, warm stone and gentle earth colours work
beautifully.
-
Choose a simple idea
A tree, branch, vase, tiny woodland scene or a few birds are easier to build than
a very detailed picture.
🖼️ Choose How to Display It
Flat Panel or Canvas
A wooden panel, thick card or small canvas works beautifully for flatter
materials such as twigs, pressed leaves, grasses and small seed heads.
It is also a lovely option if you want the finished piece to feel simple,
rustic and handmade.
Frame It with Depth
A deep box frame or shadow box is especially useful when you want to include
pebbles, acorns, thicker twigs or dimensional seed heads.
The extra space allows the natural materials to keep their shape instead of
being pressed flat behind the glass.
🌿 Cottage Tip:
If using a box frame, arrange the artwork on the removable backing board first.
Check that the deepest pieces sit comfortably inside the frame before gluing
anything permanently.
✂️ Bringing the Picture Together
-
Arrange the main shape
Place your largest twigs first. These might become a tree trunk, branches,
flower stems or the outline of a simple landscape.
-
Add smaller natural pieces
Try pebbles for birds, seed heads for flowers, acorn caps for tiny details or
dried leaves for foliage.
-
Step back and look
Before gluing, move away from the picture for a moment. Simple arrangements are
often stronger than crowded ones.
-
Glue the twigs first
Fix the main structure in place and allow it to hold before adding heavier or
more delicate pieces.
-
Add the smaller details
Glue pebbles, acorns, seed heads, grasses and dried botanicals into position.
Use only as much glue as you need.
-
Allow everything to dry
Leave the picture flat and undisturbed until all pieces are secure.
-
Finish the frame
If using a box frame, carefully return the backing board to the frame once the
artwork is completely dry.
Make It Your Own
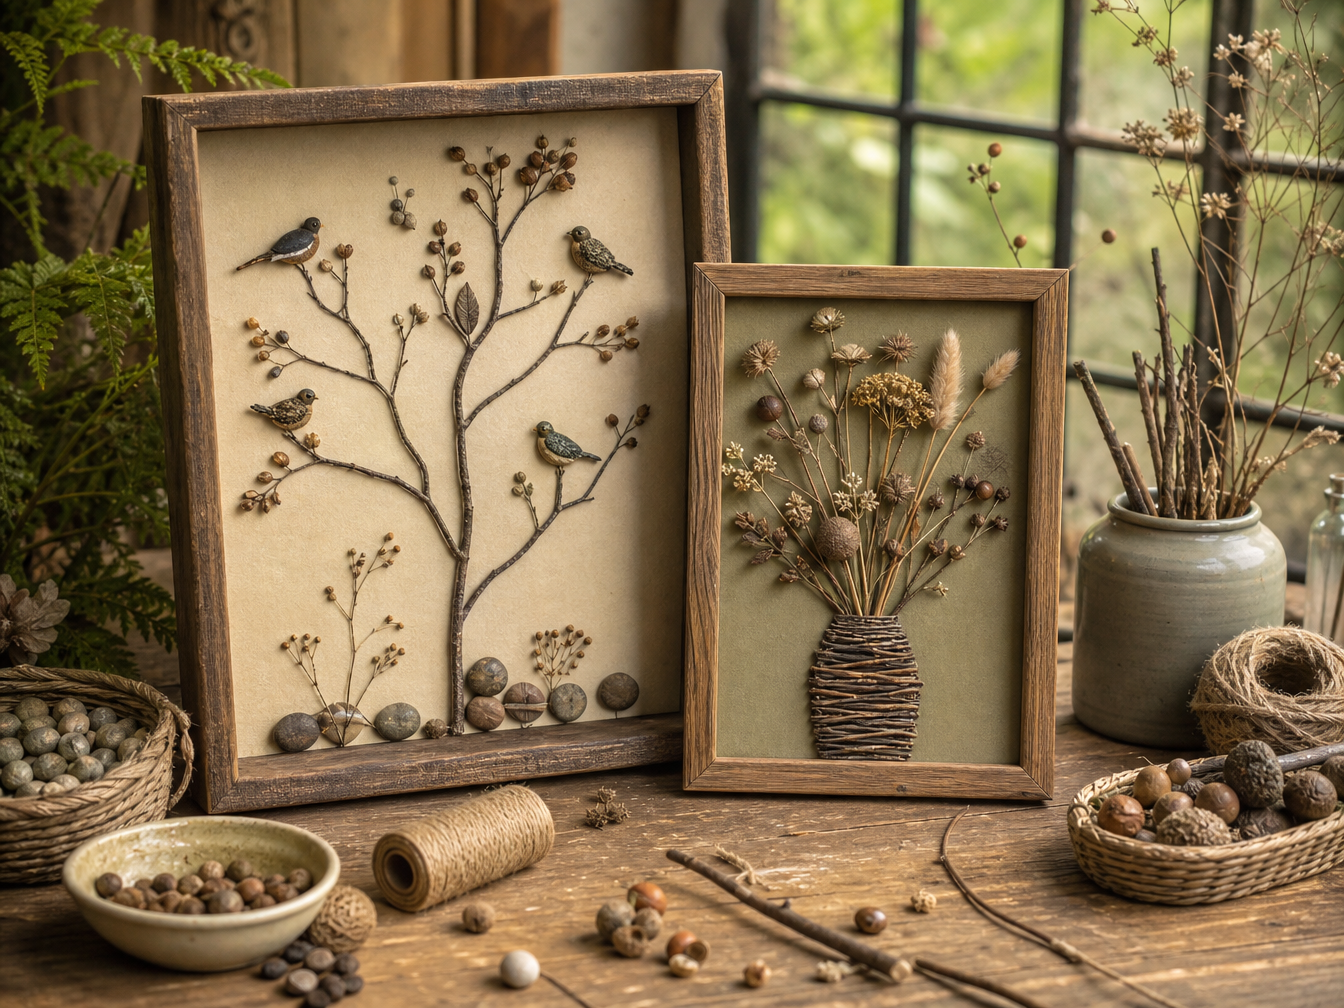
🌳 Woodland Tree
Use branching twigs to create a simple tree. Seed heads, tiny acorns or dried
leaves can become blossom, berries or foliage.
🐦 Birds on a Branch
Smooth pebbles, acorns or seed pods can become little birds resting on a twig.
Let their natural shapes suggest the direction they are looking.
🌾 Wildflower Vase
Build a tiny vase from short twigs, bark or tightly wound natural twine, then
fill it with dried grasses, flowers and seed heads.
🍂 Seasonal Woodland Scene
Let the season decide the materials. Spring blossom, summer grasses, autumn
acorns and seed heads, or bare winter branches can each create a completely
different picture.
✨ Small handmade additions can be used if you wish, but try to let the gathered
natural materials remain the heart of the picture.
🎁 Ready to Gift
Presentation Ideas
- Wrap the finished frame in kraft paper and natural twine
- Add a handmade tag explaining where the materials were gathered
- Use a second-hand or upcycled wooden frame
- Create a picture inspired by someone's favourite season
- Make a small pair of matching woodland pictures
Care Note
- Keep away from damp areas
- Avoid strong direct sunlight
- Dust gently with a soft dry brush
- Check heavier pieces occasionally
- Handle open, unglazed designs carefully
🌿 Give It a Story
Sometimes the most meaningful part of a nature-gathered gift is not the picture
itself, but where its materials came from.
A Favourite Walk
Use twigs, leaves or seed heads from a place you visit together — provided they
can be gathered responsibly.
A Family Garden
A small branch, dried flower or acorn from a familiar garden can turn the
picture into a quiet keepsake.
📝 A Little Cottage Blessing
Write this on a small card to accompany the finished picture.
Gathered Along the Way
A branch beneath the changing sky,
a stone resting quietly on the earth.
Small things gathered along the way,
given a place to become something new.
May this little piece of the living world
bring a little woodland home.
Let Nature Lead
You do not need perfect materials or a complicated design. Begin with one twig,
one stone or one little seed head that catches your eye. Arrange slowly, leave
some empty space, and let the shapes gathered from the living world tell most
of the story.